How to Upload & Manage Photos Using the AppUpdated 6 months ago
➕ Add Photos to Existing Albums in the Loop App
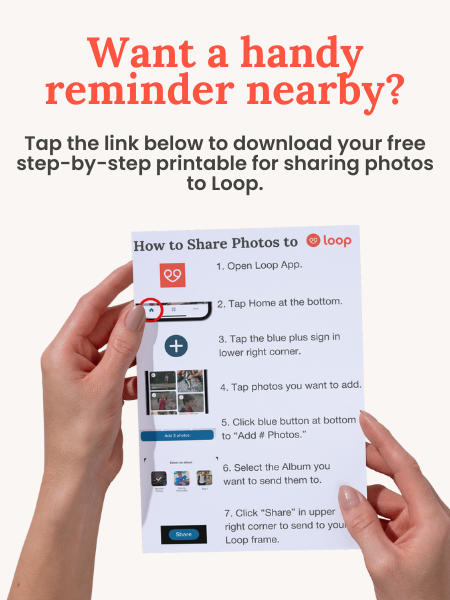
- From the Loop app, tap the blue plus sign in the lower right corner (you should see this on the home screen).
- Select one or multiple photos, then click the blue "Add ___ Photos" button at the bottom.
- Choose the album(s) you would like to share the photos to.
- Optional: This is also the time to add a caption if you would like. If you are uploading multiple photos, you can add different captions on each by swiping through each photo. Remember: captions appear on the photo on your Loop frame every time the picture comes up!
- Tap the "Share" button in the upper right corner.
- Your photos should appear on your Loop shortly! During busy times (like the days after Christmas), there might be a slight delay due to system load or local internet usage. We appreciate your patience!
Looking for other ways to share? Check out how you can share photos with our exclusive text-to-frame functionality or straight from your photo library using your device's share sheet!
Sharing Photos Across Multiple Frames 🖼️🖼️🖼️
One of the best features of Loop is the ability to share photos across multiple frames! With Loop, you can easily share albums with multiple people or send photos to multiple albums at the same time. This flexibility lets you share memories with many loved ones with just a few taps.
❌ How to Delete Photos
On the App:
- Locate the photo you want to delete (either via the Home or Album menus) and tap it.
- Tap the "Delete" button in the lower left corner.
On the Frame:
- Tap the photo you want to delete.
- Tap "Delete" from the upper right corner.
Notes About Deleting Photos
Deleting Your Own Photos: If you delete a photo you uploaded, it will be removed for everyone who has access to that photo.
Deleting Photos Uploaded by Others: Deleting a photo that someone else uploaded will only hide it for you—it will still be visible to other users.